Localstack Resource Creation on Initialization
This tutorial explains how to create the resources on the Localstack initialization. All the steps shown below were tested on Linux Ubuntu and Windows 10. Necessary files can be found here.

If you need to run the Localstack on your PC and do not want to spend time creating the resources every time you run a new container, or you work in a team and have to figure out a way to keep everybody with the same setup, this tutorial is for you.
Localstack is a test/mocking framework for developing Cloud applications, mainly focused on supporting AWS products. Below, I describe two approaches to create the resources on localstack container initialization.
I-Shell script initialization
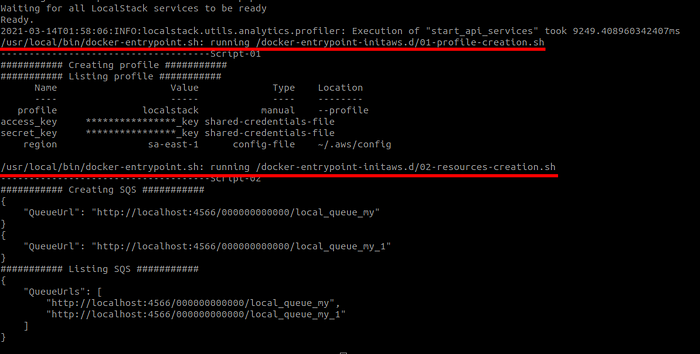
According to documentation, by default, the Localstack has a directory (/docker-entrypoint-initaws.d) used for initializing files with .sh extensions. To make it work, create the docker-compose.yml file, and in the “volumes section”, map volume from a container to a folder in PC, where your initializing files are located.
You can use any number of shell scripts, and if you need them to be executed in order, the name of each must start with a number, for example, 01_script, 02_script …
In my case, I will use the following scripts:
From a directory where docker-compose.yml is, execute a command:
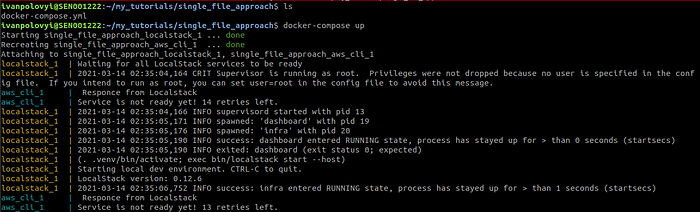
$ docker-compose up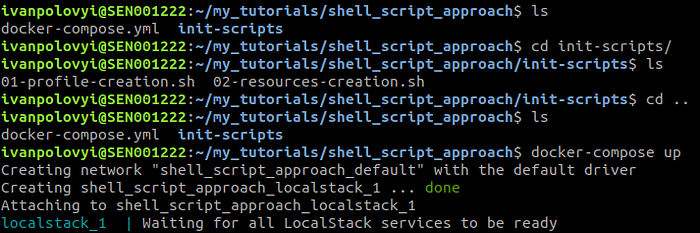
While running on Windows:
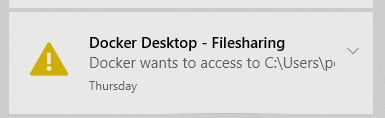
- you have to give the Docker Desktop access to the folder with the sh scripts by pressing “Share It” when it asks you to do so.
- you may stumble upon an error like below
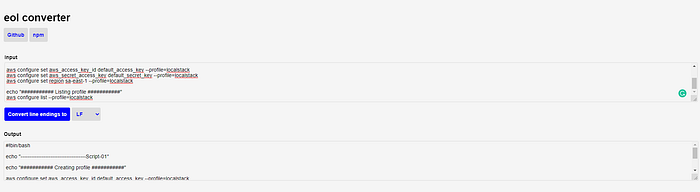
$'\r': command not found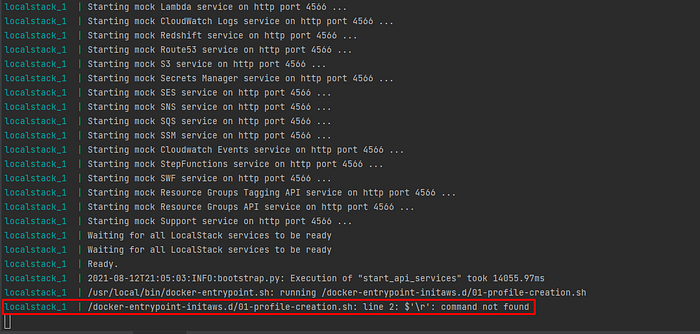
The Windows-style newline characters can cause this error. The Localstack runs the scripts in Linux (Unix-like) environment inside the container. So you have to convert your shell scripts from CRLF to LF (Dos to Unix) using tools like Notepad++ or online tools like EOL converter. After converting save your script and run docker-compos up again.
II-Single file initialization
You can do the same as above by using only one single docker-compose.yml file. For this, we will need to run AWS CLI container along with the Localstack container.
An AWS CLI container will run, then wait until the needed Localstack service will have a running state, after that, it will execute commands to create resources in a Localstack container, then it will stop. For it all to work, in a command section of a docker-compose.yml, we will add a custom shell script. This script will perform curl on a Localstack health endpoint and only when it receives a response with “sqs”: “running” it will proceed to execute the rest of the commands. In this example, the service is sqs, but anyone can easily customize a script to accomplish the required needs.
From a directory where a docker-compose.yml is, execute the command:
$ docker-compose up
Here we run 2 containers: Localstack and AWS CLI.
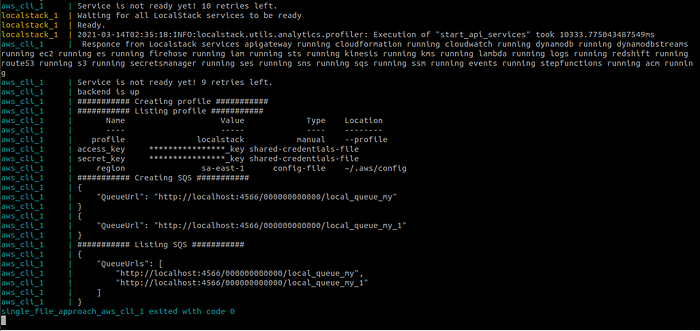
An AWS CLI did 3 health check verifications, and when received in the response running status of a service, created required resources and stopped.
Summary
As you can see we have 2 approaches. Choose one that fits you best.
The first approach is more flexible and simpler, you can create generic docker-compose.yml and just work with different scripts. However, it is worth noting that the AWS CLI of the Localstack has a 1.18.223 version (at least at the time of writing) which is not the latest one, and you have to keep the scripts separately.
The second approach is more convenient because everything is located in a single file, but it is not that flexible and a bit complicated. To customize it, you have to have shell script knowledge. One more point is that the AWS CLI version is newer.
Thank you for reading! If you have any questions or suggestions, please feel free to write me on my LinkedIn account.
More content at plainenglish.io